Showing posts with label Crafting. Show all posts

Friday, 26 September 2014

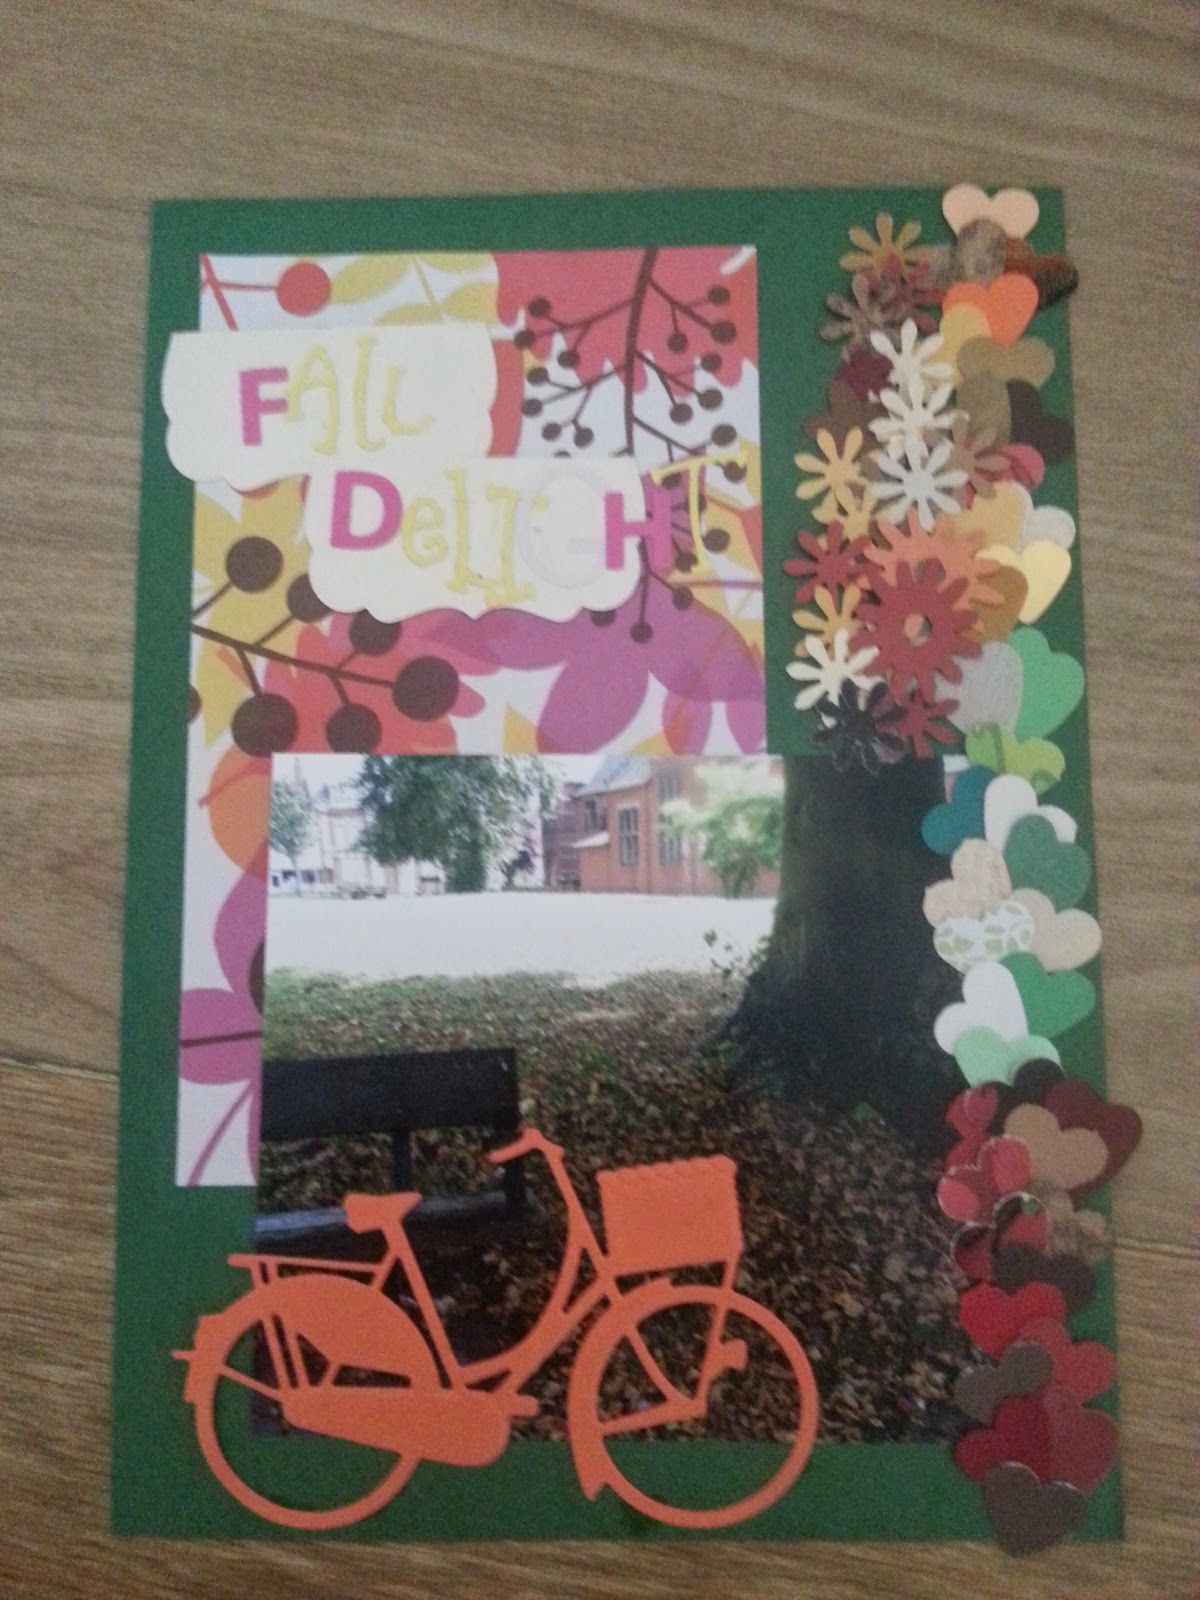
Autumn scrapbook challenge Page 2 Fall Delight


I have been lagging somewhat on the crafting front lately, i guess i have just not had the energy :-( I have been sitting cutting dies with my big shot as i am in a few swap groups on facebook. It's a fab way to make new buddies and build a collection of funky fun paper pretties to use in my projects. I even had a special helper while doing my cuttings!


I also cannot get out with my camera to take some Autumn piccies for my scrapbook project but i did have some already taken so i have managed to get page 2 done using the title Autumn delights :-) i do love the Autumn colours, it's one of my fave seasons. I love the food and fashion, i mean who doesn't love soup and chunky knits (not together tho)


This picture was taken in one of the local churchyards, it's such a calming, pretty space that is full of history and nature.


At least i have a few more piccies taken so i can get on with a few new pages, and hopefully i will be well enough soon to get back out with my camera. Emmie xxx


Sunday, 21 September 2014

A look back over the summer!

I have had a pretty up and down summer this year, not managed to have a holiday but spent time with my friends and family up north, got my creative on and had a beautiful garden. I have had some fab crafting competition wins and been featured in a few magazines which i am really proud of as i have really just begun crafting :-) I have also had some rotten health issues that today are absolutely driving me mad! I have no energy and have not managed to get out of bed today (even though the past week i have only made it as far as the couch) So i decided today would be a fab day to look back at the good things and maybe perk me up a bit!


Here are a few pictures taken while in Hull at my Aunties and around the Yorkshire coast.


A reminder of the yummie food i can have on my diet as i have fallen off the wagon the past 2 weeks but tomorrow i am back on it :-) 


Some of the loves of my life :-) The people and fur babies that make it all worth while <3


Piccies of my garden and the beautiful sunflowers, my home town, some animals and insects i've rescued over the summer and the storms which have been pretty intense this year, but i have loved every min of them.


Finally some of my blog post creations and pretties i've made for projects or for fun and to share tutorials with you all. I promise there will be lots more to come from me over Autumn and beyond once i shake this episode off which i am hoping will move on sooner rather than later! But i do have restriction friendly posts coming up :-) 

Have a look though your phone and smile about summer! 

Enjoy the rest of your sunday everyone 

Emmie xxx


Monday, 8 September 2014

Tutorial- Home made Acrylic dots

As you can tell from my recent posts i love to make my craft supplies and recycle! Well i have millions of plastic pony beads i will never use as beads and wanted to find another use for them. I had been looking at some acrylic dots to use on my crafting pages but they are soo expensive for what they actually are! Anyways the light went on upstairs and hey presto an idea came to mind. i had made suncatchers before by melting lots of beads together in a cake tin in the oven and they came out amazingly. so i thought why not mwlt the individually spaced out instead of all close together.

All you will need to make these is a selection of hard plastic beads, some greaseproof paper, a baking tray, light spray oil and an oven.


I got 15 bags of these at the car boot sale for £1.00 absolute bargain.


Spray the paper with a light oil to stop them sticking to it, they can be a little tricky to remove from the paper. Spread them out so they do not melt together unless you want them to to make flowers etc. 


In the oven they go for 15 mins at Gas mark 6, you will get a little smell of melting plastic but it's not a strong, overpowering smell.


Remove from the over and hey presto acrylic dots for crafting for pennies! I picked these colours to use on my Autumn scrapbook project that i shall be starting today.

Have a fab day everyone Emmie xxx


Sunday, 7 September 2014

Scrapbooking challenge Setting up :-) Autumn 2014

Woooo hooooo at last i have managed to get into my room and pick out some of the things i will need for my scrapbooking. I find that if you have a basic kit ready to go it makes it so much easier and gives you more time to concentrate on your page than spending half your time looking for bits and bobs.

I always use an a5 folder for my scrapbook as it's a lot cheaper and a lot easier to store also. I got my latest one for 50p from a car booty with zillions of plastic wallet pages to. I just decorate the folder however! It takes me back to being as school decorating folders, ahhhh memories.


I also chose loads of autumn coloured cards to use as my main pages and will just chop them in half with my paper cutter to make them a5. Once again having these pre cut and in the folder makes it so much easier and it really will save you valuable time that you can spend actually crafting.


Having lettering stickers ready in the colours you want saves loads of time to but i also will be die cutting some letters to use with my new Marrianne Design letter die, I absolutely adore the range, it's fun, quirky and have a huge selection of different designs.


Finding embellishments that you can use is also advisable, here i have dug out a selection of rub ons, sticker frames, edging tape, gems and pearls. These will make your page pop and look uber pretty! 


Here are a mix of different textured papers and cards to use to mount your piccies on, you can have loads of fun with these by distressing the edges with sandpaper, inks and punches to make them stand out.


More bits and bobs to make the pages pop :-)


Pick out a mix of things you can use on your page like buttons, die cuts, punch cuts, tags, wool, twine, ribbon, beads, sequins, basically the really fun stuff that makes your scrapbook a really personal project.


Lastly the basic tools you will need to create your mini masterpieces of memories. I will also be using my inks, stamps, die cutting machine, heat embossing and so on but i will use them as and when i need them. But having all this prepared and ready really does make life a lot easier and gives you lots of inspiration before you have even begun.


Well i am off to build my first page oooo which one shall i pick?? Is anyone else doing an Autumn scrapbook? Let me know if you are i would love to see what you have created.

Have fun Emmie xxx


Packing up!

Right here we are! All madness hopefully is now behind me, i am back home and have my dearly beloved laptop is here with me so i can return to blogging and by how i have missed it :-) I have now caught up on my letters, and die cuts to swap, but I do have got loads of cards to make for friends and exchanges! And eventually i will get a chance to get my Autumn scrapbook prepped and started also :-) All on the agenda for this afternoon, i spent 2 days unpacking the mother of all ebay lots i got for a bargain price which was full of everything crafty you could possibly need! I swear it took me so long to unpack, sort and get into the creation cave with the help of my amazing man.


I did get some help sorting out from my beautiful boy ollie (he would call it helping anyways)


Here is one of my swaps envelopes for Autumn i have got sorted and ready to go to Brazil!

Right i am going to get on with my plans and will be back with a blogpost or 2 this evening! It's only taken a week to get this sorted, but first i'm watching Lewis Hamilton go and collect his winners trophy on the podium :-)


Thursday, 4 September 2014

Good to be back :-)

Well after a few days of unplanned madness i am back with my beloved laptop and ready to share some blog posts with you all. I have been thinking as that time of year approaches that i quite honestly ditest, just how un organised i am again and how i intend to get on top of it all next year have a homemade Christmas for all my friends and family. I've decided every month of next year i'm going to pick one group of friends or family and make all their presents and cards ready for xmas 2015 starting in January. I want to make it personal and special and less commercial and thoughtless. It's going to be lots of fun and bring you many interesting posts for sure! I can't wait to start planning who's getting what. I have so many people to buy for as i have a massive circle of friends and family with a vast spectrum of likes and dislikes, there really is going to be a challenge but i am really looking forward to it.


Right now i am away to play with my goodies i got before i went away :-) I am sure i will return with a make later on in the day! Have a fab one whatever you are up to Emmie xxx

Saturday, 30 August 2014

Tutorial Inches card :-)

Today has been the first day i have really noticed Autumn is on the way not just weather wise but looking around the garden i am spotting lots of brown leaves blowing around. This has inspired me to make an Autumn card and use some of the bits blowing around to decorate it. I have been going to try inchies for ages and i decided there was no better time to get on and make some as i wanted to do a card tutorial over the weekend, this has also got ideas going for my new scrapbooking adventure also.

What you will need.......

1 Sheet A4 card in black
1 Sheet of A4 card in brown
Backing papers
Small square die
Bigshot
Liquid Pearls
Double sided tape 
Double sided foam pads
Tim Holtz dies
Memento Inks
Twine
Twigs
Dry sticks
Wool 
Embossing folders
Sticky Gems
Letraset ProMarkers 
Scissors
Butterfly Punch
Ruler
Scrap of White card
Folding bone


Firstly take your A4 sheet of black card and fold it in half then take a folding bone and run it down the fold.


Use the small die and cut 12 squares from the brown sheet of A4 card to make your inchies and emboss 4 of them with different folders.


Take your card and select some backing paper, i chose some burnt orange mulberry paper. Trim it to 19.6cm x 12cm ready to place on the front.


Next measure the black card to make sure the backing paper is central.


Take a pencil and mark these measurements to make sure the panel is central.


Layer up the back with double sided tape and get ready to attach to the black card following the pencil marks.


Fiddle around and decide what spacing you want to use for your squares then stick your foam pads on the die cut squares ready to stick.


The measurements i went with 0.3cm on the outer edge, 0.6cm on the vertical lines and 1.3cm on the horizontal lines. I started with the middle row and worked outwards.


Next the fun bit of decorating the squares, i have left the embossed ones blank to add texture to the card. In the garden i found lots of little brown leaves, dry twine and dry grass heads i wanted to add to the card. I also wanted to use some of the toppers i had made a few days ago.


I cut this with my Tim Holtz Alterations Bigz flowers die using mulberry paper and distressing the edge with the Memento ink to place on one of the squares.


Next i wanted some stamping on the card so i decided to partially stamp on to the scrap of white card, colour with Letraset ProMarkers and cut to fit.


I thought these were cute so i bunched them and wrapped them in green wool finished off with a bow for that bouquet look.


I decided to cut one of the leaves with the butterfly punch to layer up with a larger butterfly punch. I do love my Woodware craft punches, i use them for most of my projects.


How cute is this?? Cut from a bay leaf.

I also snapped some dried twigs and wrapped in twine secured with glue. The best one to use for this was my glue gun to make sure it wasn't moving. I attached a little leaf onto the twine to give it a little extra Autumn feel.


Arrange all your bits and attach when you are happy with the layout. This is my first inchies card i have made and i am very pleased with the outcome of it. I will deffo be doing this again for the festive season, ooooo the ideas are flowing already.


Hope you all like it Emmie xxx


Friday, 29 August 2014

I think summer has gone!!

Well i think it's safe to say that summer has left the building and Autumn is well on the way, i can't believe the X Factor starts this weekend either or as i call it countdown to my holiday. To be honest this isn't a problem for me as i love my winter wardrobe and all my comfy knits, boots and waistcoats. There's nothings better than when it's dark and stormy outside and you are all tucked up cosy on the couch with a hot choccy and a dvd. It also gives me lots of crafting time and a chance to try out new projects, for me this Autumn it's going to be scrapbooking :-) I did the 31 days f December last year and i loved it, in fact i really can't believe i haven't done any scrapbooking throughout summer but i a all over it for Autumn for sure! I have been having a look about on Pinterest and have found a few inspiration lists so here is the one i am going to be following from the 1st September till the 31st October 2014.


I can't wait to get stuck into it especially with my gorgeous new camera to snap my piccies with and really make lots of pretty pages to look back on! If anyone else fancies taking part i'd love to see what you can come up with :-) I will share my prep kit over the weekend ready to embark on this fun project.

Emmie xxx

Thursday, 28 August 2014

Scrapbox challenge 3rd make Toppers

Yesterday was a bit of a off one so i just created a quick post to share with you some pretties i had created and today i have made a little tutorial to show you how to make these cute lil toppers for all papercraft projects.


If you do throw away the off cuts from your projects then you are wasting lots of opportunities and monies.

For these gorgeous toppers you will need......

Scraps Box
Punches
Dies 
Buttons
Cutting machine
Double sided tape
Gems and jewels 
Double sided sticky foam pads


I use my Sizzix bigshot for cutting my shapes and an assortment of dies


Here i am using a Muller yogurt sleeve that was too pretty not to use to cut some bases for my toppers. I use lots of different papers and materials from the scrapbox but heavier based scraps work better for building on for your bases.


When using punches avoid mulberry woven style papers as they rip and jam in the punches but card and papers are fine to use.


For these i cut a selection of things with mixed dies and punches all from scraps out of the box, i love my new Marianne Design alphabet die, along with my Woodware Craft Collection punches.


Once you have a nice selection of colours and shapes start playing around and layering up the bits and bobs you have cut. Once you are happy start to stick them in place with double sided foam sticky pads and double sided tape.


Then when you are happy with positioning add the sticky gems, buttons (which have been removed from old clothing) and pearls wherever you think they they will enhance the designs.

I think these are gorgeous and am going to make up some packs to give to my crafty friends at Christmas. They are in a sense 90% free to make as the bulk of them are made from bits that would go in the bin.

Hope you enjoy trying this out :-) 

Emmie xxx


Wednesday, 27 August 2014

Right off day!

Today has been one of those you wish you had just slept through for me, it's been a disaster from beginning to end but never mind we all have them i guess. othing a good meal, a long hot soak and a nights sleep can't help to fix!

I have had a fiddle around with some bits and was going to post a tutorial but my mind is just not on it so i shall share with you what i made in anticipation of the tutorial to come over the next few days. I hope you like them, i am totally in love with these fun and funky toppers, i think i have found my latest addiction for the next few weeks.


Once again these have all been cut out of the good old scrap box to see what i can create from bits that would usually go in the bin.

Normal service shall resume tomorrow all being well :-) and i shall be making a few pretties to share with you all.

Night night all

Ems xxx